
Creating jobs
Note
To execute jobs, the corresponding outgoing and incoming ports on the server, switch and all network devices must be enabled. The default protocols are: SSH and TFTP.
The ports through which a connection is established can be changed in the Job configuration. The port for TFTP server functionality can only be accessed by one switch at a time.
If you want to backup more than one switch at a time, create a different TFTP port for each switch and, in the AdminClient under INI files, increase the maximum number of parallel uploads.
To create jobs for Scalance Switches
- Start the AdminClient and open the Jobs module.
- In the Project tree, select a Scalance component.
- Create a job with the upload type Switches.
- Configure the sections General and Upload and compare.
- Under Upload and compare set the compare policy to Backup <-> Previous backup, in case no project data in the components was versioned.
- Configure the section Switches settings. 1. In Device, enter the IP address or name of the device that you want the job to access. 1. Fill in the fields User and Password with your login details. 1. Select the Type, Scalance or Scalance (WBM)
Note
- Scalance (WBM) applies exclusively for Scalance S6xx and Scalance XM4xx.
- If you have selected the Scalance type, make the following settings:
- In the Command dropdown menu, select the command to be executed to back up the switch.
- By default, the Auto value is selected. This means that the correct command is automatically selected based on the model number of the switch (for example, all models between 300 and 399 are backed up with the saveload command).
- In individual cases, however, it is necessary to select a different command for a specific switch, for example, if there are different states of the firmware for the same switch.
- The three possible options (save, saveload and loadsave) designate the respective command used to save the configuration. The command can be found in the respective manual of the switch within the Command Line Interface (CLI) commands.
- In the section Port, enter the outgoing port that you want to connect to the device.
- For TFTP Server IP Port, enter the incoming port to receive data from the device.
- If you have selected the Scalance type, make the following settings:
Note
The default value is 69. 1. For Name of configuration file, specify the configuration file that will be pulled from the device.
Note
- The default value is config.cfg. You will need to enter this value in File specifications and comparator settings. If you have a different name for the configuration file, it must be changed here.
- Check the checkbox Remove firmware if the firmware data is also to be saved.
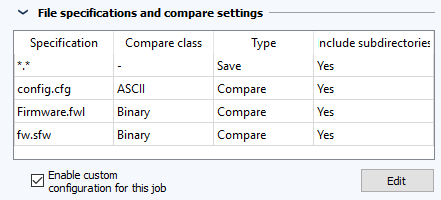
- Configure the section File specifications and compare settings.
Note
To prevent the likelihood that differences will be detected after each job execution, the current valuesSystem Up Time and System Time must be excluded from the comparison. The comparator can only be configured if a version of the component project data was created.
](Scalance_Comparator.PNG) 
1. Check the **Enable custom configuration for this job** checkbox and click on **Edit**.
1. Use **Add** and **Remove** in order to configure the settings for the **Compare these files** and **Do not compare these files** tables.
Note
You can use wildcards. The entry .txt affects all files with the file extension .txt. 1. In the table Compare these files, click on the space and select the desired comparator from the dropdown list. 1. In both tables, click on the desired field to determine if the entry for this line should also apply for files in subdirectories 1. Click on Configure comparator* to configure further settings for the selected comparator.
Note
This option is not available for all comparators. 1. Determine whether you want to detect changes by Timestamp or by Checksum. 1. In Memory settings under Ignore empty directories, define whether or not empty directories on the device should be backed up. 1. In Compression factor, select the compression factor for the backup.
Note
For low compression factors, less time is required in order to compress the backup. However, the backup will take up more disk space on the server. 1. Close the dialog by clicking OK.
- Check the checkbox to determine if you want a backup of the firmware to be generated during a job execution.
- Save the job and execute it.
Note
The file specification and compare settings only apply to the job that they were made for. In the list Jobs, you can use drag and drop to apply these settings to other jobs.
Related Topics
- Installation requirements -> Ports used as standard
- Restoring projects
- Integrating projects
- AdminClient -> Job configuration
- AdminClient -> Copying job configuration by drag and drop
- AdminClient -> INI files