
Creating jobs
By using versiondog , you can create jobs that periodically check if the program on the device has been modified. You can also use jobs to schedule routine backups of the program.
To create a job for a KUKA KR C2 robot, proceed as follows
- Start the AdminClient and open the Jobs module.
- In the Project tree, select the KUKA KR C2 component.
- In the menu tab, click on Create or drag-and-drop the components into the Jobs section.
- Check in the section Job configuration, if the upload type KUKA Robot is being displayed.
- Make sure the desired settings are in place for the following sections: General, Notification, Upload and compare, Create a version automatically after job run. The Notification and Create a version automatically after job run sections are only displayed if the necessary settings have been implemented. For more information on configuring the general sections, please refer to Jobs in the tutorial AdminClient.
Note
Under Upload and compare set the compare policy to Previous backup <-> backup, in case no project data in the components was versioned.
- Configure the section KUKA robot settings.
In the section advanced, you will find the old upload method with NetworkConnectivity and other options:
1. In **Type**, select **KRC2**.
1. Enter the **Device name / IP address** that you want to create a job.
Note
If the UNC path of the share is \KukaRobot5Backupversiondog, then KukaRobot5 must be entered here. 1. In Path to the project, enter the name of shared folder in which you wish to store your backups.
Note
If the UNC path of the share is called KukaRobot5Backupversiondog, then the “Backup” (without ) must be entered. 1. In Subdirectory, enter the name of the subdirectory in which you wish to store backups.
Note
If the path is KukaRobot5Backupversiondog, then versiondog (without ) must be entered here. If the UNC path is KukaRobot5Backup (without a subdirectory) this field will remain empty. 1. In User enter the name of the domain, user, or computer that you wish to use to access the network share. 1. In Password, enter the password. 1. In fail if project is older than, enter time period that is allowed to occur before a warning is generated due to the backup not being created. 1. In Create backup via NetworkConnectivity, specify whether you want to keep the newly created backup on the robot or on the versiondog server. 1. When you activate Create backup via Network Connectivity, the backup of the program running on the robot will generated by NetworkConnectivity. 1. In Keep the newly created backup on the robot, specify whether you want to retain the newly created backup after the job execution or whether you want to delete it.
Note
- This option is only available when Create backup via NetworkConnectivity is activated.
- In Limit the backup count on the robot, specify how many backups should be retained on the robot. When the max number of backups is reached the oldest backup will be deleted
- In Trigger file resource, enter the name of the network share in which you want the Trigger file for NetworkConnectivity to be created.
- In Trigger file path, enter the subdirectory and the file name under which you wish to create the trigger file for NetworkConnectivity.
- In Archive name format enter the name format that you want NetworkConnectivity to use when creating a backup.
- In Sleep interval between data packets (in ms) and Maximum size of data packets (in KB), to limit network traffic.
- Configure the section file specifications and compare settings.
Note
This helps to prevent the likelihood that, due to running values, differences will be detected during job execution. The comparator can only be configured if a version of the component project data was created.
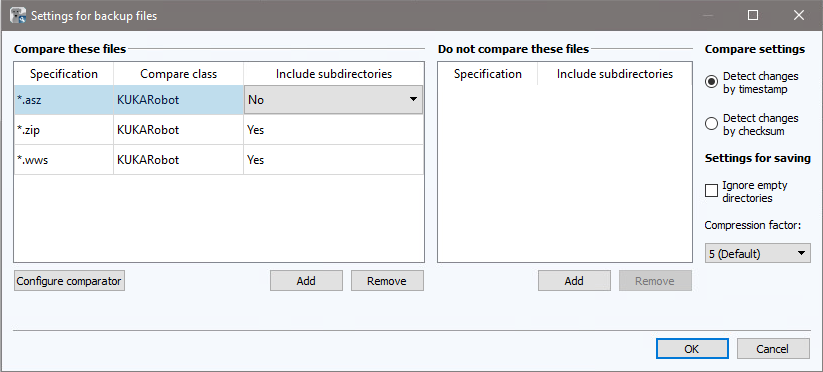
1. Check the checkbox **Enable custom configuration for this job** and then click on **Edit** if you want to adjust the comparator configuration for this job.
1. Use **Add** and **Remove** in order to configure the settings for the **Compare these files** and **Do not compare these files** tables.
Note
You can use wildcards. 1. In the table Compare these files, click on the space and select the desired comparator from the dropdown list. 1. In both tables, click on the desired field to determine if the entry for this line should also apply for files in subdirectories 1. Determine whether you want to detect changes by Timestamp or by Checksum. 1. In Memory settings under Ignore empty directories, define whether or not empty directories on the device should be backed up. 1. In Compression factor, select the compression factor for the backup.
Note
F or low compression factors, less time is required in order to compress the backup. However, it will mean that the backup will take up more disk space on the server. 1. Close the dialog by clicking OK.
- Save the job and execute it.
Note
The file specification and compare settings only apply to the job that they were made for. In the list Jobs, you can
use drag and drop to apply comparator settings to other jobs.
The process of creating a backup using NetworkConnectivity
- versiondog creates a trigger file and stores this in the configured network archive share.
- NetworkConnectivity places a new backup of the version on the robot and deletes the trigger file from the network share.
- NetworkConnectivity places a ZIP archive in the backup directory.
- versiondog copies the ZIP archive to the server archive.
- versiondog deletes the old zip archive in the backup archive (optional).