
Creating jobs for ControlLogix controllers
versiondog can create backups from ControlLogix controllers.
If you have a valid and licensed version of the RSLogix 5000 editor, you can reupload the backups directly onto your ControlLogix controller (disaster recovery) as well as carry out a detailed comparison.
The RSLogix 5000 editor is installed on your versiondog server or client.
- Advantages:
- Simplified configuration of backup jobs (RSLinx files are available directly).
- Disaster recovery is possible. (A backup of the PLC can be directly reuploaded. It is possible to revert back to an earlier version of an ACD file.)
- Detailed comparison is possible.
- Current values are included in the backups.
- Disadvantages:
Note
If the RSLogix 5000 editor is installed on the versiondog client, you will require a versiondog agent. – You will require an activated and licensed version of Rockwell Automation (license costs).
Proceed as follows
- Start the AdminClient and open the Jobs module.
- In the Project tree, select the component for which you want to create the job.
- In the menu tab, click on Create or drag and drop the components into the Jobs section.
- From the Upload type dropdown menu, select the value RSLogix 5000.
- Go to the Job configuration section.
- In the Upload type dropdown menu, check that the correct upload type has been selected.
- From the Execute dropdown menu, select if the job is going to be executed according to a schedule or using the BackupClient.
- Make sure the desired settings are in place for the following sections: General, Notification, Upload and compare, Create a version automatically after job run.
- Configure the settings in the RSLogix 5000 settings section.
 1.Image: Job Configuration, sections RSLogix 5000 Settings and Advanced
- The RSLogix 5000 project’s ACD file should have been automatically selected. This is located under Project. If this is not the case, select this file from the dropdown list.
Note
- If the component does not contain a project, this will be displayed as a notification when you open the dropdown
list. In this case, RSLogix5000.ACD is entered as project name by default. 1. In the Communications path, enter the gateway data. Depending on the software in use (RSLinx, Classic or FactoryTalk Link), there are different ways of doing this: 1. If you updated RSLogix Enterprise Edition via FactoryTalk Linx, you will need to enter the communications path manually: 1. Proceed as follows: 1. Open the FactoryTalk Linx Browser tool and right-click on the project. This will in turn open the project’s configuration. 1. Here, copy the path of the Device path. This can be, for example, RSLinx Enterprise!Ethernet10.0.220.145. (The RSLinx Enterprise! part of the path is optional.) 1. Enter the path into the Communications path field. This is located in the job configuration. 1. If you use RSLogix Enterprise Edition or RSLogix Classic Edition, the communication path can be selected using the Browse option: 1. Proceed as follows: 1. In order to select the path to the PLC, click on Browse behind the Communications path. 1. A dialog will open and you can select the PLC that you want to be saved by the job. At the end of the page, there is a field that shows the current selected access path. The content of these cells are copied into the Communications path when you click on OK.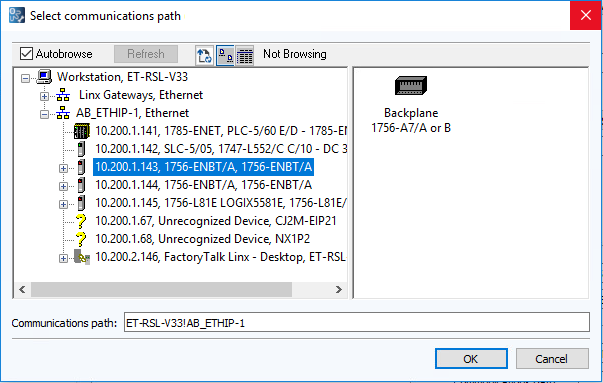 1. Image: RsLogix 5000, Access Path
- Check the checkbox Merge into offline project, to merge the current status of the project on the controller with the status already saved on the server.
Note
- If the component does not contain a project, clear the checkbox Merge into offline project.
- If you do not want the project to be merged with the offline project, information about the controller can be recorded. By default, the checkbox Automatically recognize controller information is checked and the project name and changes are determined automatically. To enter the revision manually, clear the checkbox.
- By clicking on Warn when forced values are active, you can decide if you want to have a warning displayed when forced values are active in your project.
Note
- A displayed warning can be useful. This can, for example, be useful when using manual control at your facilities and there is the chance that the forced values could be overseen.
- Select your job then go to Execute and click on Execute selected jobs once.
Known problems when executing jobs
If the AdminClient Event logdisplays the error message: “At least one instance of RSLogix 5000 editor is still active [21700]” you can resolve the error by running RSLinx as a service. Start the RSLinx (Classic) Launch Control Panel and then check the checkbox to run the application as a service. Then run the job again.
When using firmware revision 32, creating a backup may not be possible. Error messages may occur during job execution. This is a known behavior. If you experience this, we recommend using a different revision of the firmware and then running the job again.
If the event log in the AdminClientis displaying an error message that a modal dialog cannot be displayed (“Error when uploading the CLX [Details: A modal dialog is currently displayed so the requested action cannot be completed.]”, this may indicate that the start screen of RS Logix cannot be displayed. This can occur if there is no ActiveX installed on the computer. You can fix this error by doing the following:
-
Start the application
<tt>Regedit.exe</tt>with the user account on which the Upload Agent is running. -
Then go to
<tt>SOFTWARERockwell SoftwareRSLogix 5000Start pag e</tt>. - Now adjust the key Never Show as required.
