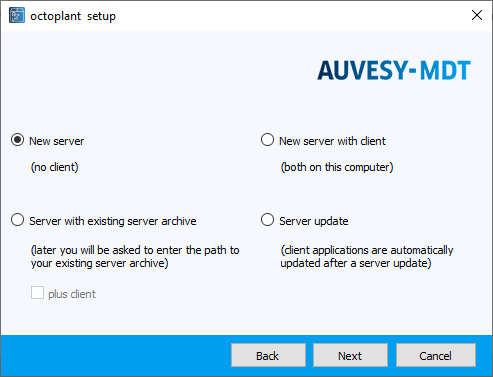
Installing a new versiondog server with no client
When you install a new versiondog server with no client, only the versiondog server application will be set up. The versiondog client applications, required for configuring and managing the versiondog server, must be installed separately.
Installation requirements
- The versiondog setup file needs to be accessible.
- You must have a valid versiondog license file.
- The user or user account used for the installation must have administrator rights.
- The drive, set to store the server archive, must allow files to run. There is a likelihood that existing antivirus software must be deactivated if they interfere with files being run.
- If the execution of files is not allowed, an error message (SQL exception) will be displayed later when logging on to the system. Login is not possible.
To install a new versiondog server with no client, proceed as follows:
-
Select New server (no client) and click on Next.
-

- Enter the path to the versiondog license file and click on Next.
- You can enter the path manually or click on the Browse… button.
- Specify a path to the directory for the versiondog server application program files.
-
You can enter the path manually or click on the Browse… button.
-

- We recommend retaining the path suggested by the installation wizard. Example:
- C:Program FilesvdogServer
- The field Path to the client applications: will be displayed. It is, however, greyed out. If no client applications are being installed, it is not possible to make an entry in the field.
- Click on Next.
- Select where to save the server archive. The following options are available:
- Local:
- The server archive is stored in a local directory.
- Remote:
- The server archive is saved in a remote server archive.
- Click on Next.
- Specify the path for the local server archive and a directory for the client setup files.
-
You can enter the paths directly or select the Browse… button.
-

- We recommend that you keep the default paths:
- Examples:
- D:vdServerArchiveD:vdServerArchivevdog client setup
- If you have selected the option Remote: as the location of the server archive, the Path to the project file on an external drive will be displayed. Enter the path to the remote directory in this field (format: system namesharepath).
For technical reasons, a path for the local server archive must also be entered if the Remote option has been selected. The user or user account from which the installation is performed requires read and write permissions to the remote system.
Note
- The server archive contains a number of data: Versions, backups, metadata, etc. Plan sufficient storage space for the
server archive. 1. Click on Next. 1. If you want to make the versiondog client setup files available on the network, enable the option Create the above network share. The Create network share option is not active by default. 1. The name of the network share is vdog client setup.
Note
- By default, each user has read rights to the directory and administrators have full access.
- Click on Next.
-
Specify the user account from which the versiondog services should be started. You have two options: System account and Username.
-

- The account you specify must have full access to the server archive directory. We recommend you to select the Username option and choose an account with administrator rights. The local system account may not have the necessary rights.
- If you choose to use a domain account, the domain must always be specified. Format:
<Domain>`` (Example: DATAMANTomT). - Click on Next.
-
Now the dialog for entering the password for the superuser versiondog will open.
-

Note
- The password change-it must not be used. If the password change-it is set for the user during the server
startup, a critical error will be written to the versiondogevent log. You will then need to change the password the next time you log in. 1. If you want to install versiondog sample data, activate the option Install examplesBy default, the Install examples option is disabled. The example files are used only for the purpose of illustration. The versiondog system is still fully functional without these. 1. Click on Next. 1. A summary of your input will now appear. 1. Verify the displayed data. If everything is correct, click Next. 1. The setup will begin. A message box will indicate when the installation process is complete. 1. If the Windows Firewall service is not active during the installation of versiondog, a dialog will appear. To proceed with the installation process, click on Continue. 1. After successfully completing the installation, click on Finish to close the installation wizard.

