
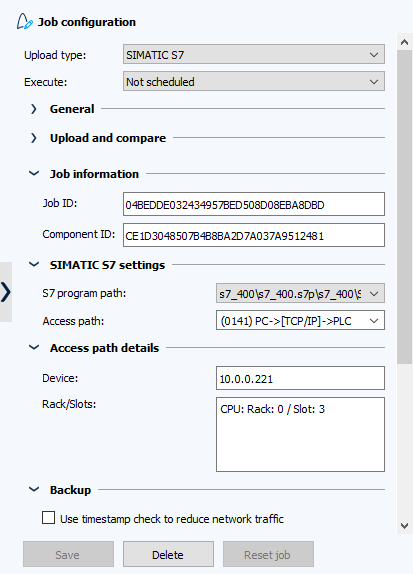
Job configuration
Based on the procedure for upload type SIMATICÂ S7, you will be shown an example of a job configuration. For each upload types, there are specific variations in the job configuration.
Section: Job configuration
Example:
- Start the AdminClient and open the Jobs module.
- In the Project tree, select the component for which you want to create the job.
- In the menu tab, click on Create or drag and drop the components into the Jobs section.
- Check in the Job configuration (right side) if the preselected Upload type is the one that you want to use.
- When selecting Execute, you need to decide if the job is to be executed according to Scheduled, Not scheduled, Using BackupClient or Triggered by URL*****.
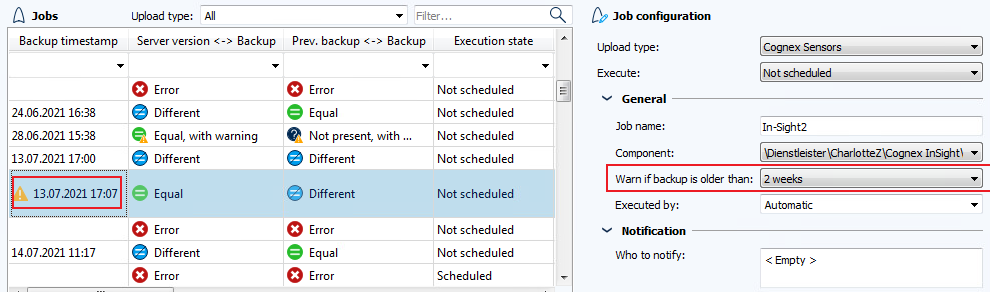
Section: General
- Job name: Give your job a descriptive name (limited to 64 characters).
- Components: Under Components, select the path to your component in the Project tree.
- Warning when the Backup is older than: Select an age for the backup from the dropdown if required. The default selection is Never warn.If a time period has been selected here, jobs, for which the backup is older than the selected time period, are marked with a warning icon. This is located in the column Timestamp backup.
- Schedule: This field will only be displayed if you have selected the value According to schedule located under the drop-down menu Execute. Once you have selected this field, the dialog Schedulewill then open. Here, you can enter the start time and the frequency that you require.
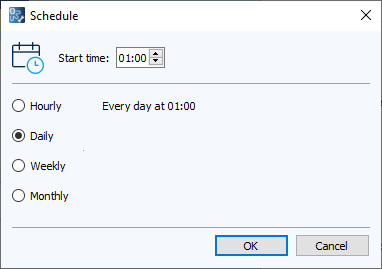 Image: Dialog Schedule
- On error: This field will only be displayed if you have selected the value According to schedule located under the drop-down menu Execute. Once you have clicked on this field, the dialog On error will then open. Here, you can enter if you want a job execution to be repeated when errors occur. You have also the option here to determine the maximum number of attempts as well as the length of pauses between different attempts.
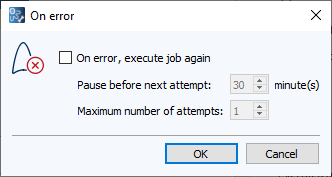 Image: Dialog On error
 - Execution by: This displays the name of the machine from which to run the job. By default, this is determined automatically. In case of server synchronization, if the job is to be executed only on one of the synchronized servers, the corresponding server must be selected here. When the value Automaticis used, the job will be executed by both servers after synchronization. !!! note After importing a license with a new serial number, it may happen that the (old) serial number is displayed here instead of the computer name. If this should occur, you can do the following steps: – Restart the MasterService, if you have not already done so. – For parallel servers, check in the System Dashboardmodule whether all to-dos have been processed. – If the display is still wrong, you have to select a new computer name. Otherwise, the job cannot be executed according to the schedule.
Section: Notification
The Notification section is displayed only if you have specified in the Upload Type-Specific Configuration dialog that job-specific or daily emails are to be sent for job execution.
- When you click on the field Who to notify.
- The dialog Who to notify will open.
- Select the users and user groups to be notified and check the appropriate checkboxes.
- E-mail recipients who are not users can be entered in the field Additional email addresses. Enter multiple users separately with commas.
Section: Upload and Compare
- Save policy: The following options are available to you:
- Always save backup (overwriting previous backup if equal): Use this option if you want to create a maximum of one backup. It contains the current values and all other files that are ignored during the comparison.
- Save backup only if different to previous backup: Use this option if you only want to add a new backup, when a change is detected (which depends on what values are included in the compare process)
- Always save backup (keeping previous backup even if equal): Use this option if you want to add a new backup every time a job is executed. If your traceability rules require you to keep backups for at least a year, you will need to make sure that the number of remaining backups (Rollover) is set based on your backup frequency. Bear in mind that use of this save policy with a high roll-over number could result in a lot of disk space being used up.
- Number of remaining Backups (Rollover): Entered the desired value. After reaching this value, the new Backup will overwrite the oldest. The default is: 5
-
Upload Agent: If you want to use an upload agent for this job, select it under Upload agent. Click on Check connection: To ensure that the computer on which the agent is installed can be accessed. If no success, the job will fail as well. !!! note Remember that when you use an agent, all user ID information and paths relate to the computer on which the agent is installed and not the server. If you later specify a username or a network path, you need to make sure that this user exists on the computer on which the agent is installed or that the network path is accessible from the computer in question.
-
Comparison strategy: Select a Compare policy from the dropdown list. This contains the following options:
- Server version <-> Backup, Previous backup <-> backup The backup of the (online) version on the device is first compared with the last checked-in version of the project, this backup is then compared to the last backup.This option can give you more information than any other. It is however important to think carefully when interpreting the results.Examples:
- If the backup is different from the previous backup, but the same as the last checked-in version of the project, this indicates that a version was developed in the project, checked-in, and then deployed to the device. This is the recommended workflow.
- If the backup is different from the last checked-in version of the project, but the same as the previous backup, this indicates that a new version of the project has been created and checked-in, but not yet deployed to the device.
- If the backup is different to both the last checked-in version of the project and the previous backup, this indicates that a new version of the project has been developed and deployed to the device, but not yet versioned and checked-in.
- Server version <-> Backup The program running on the device is compared with the latest checked-in version of the project. Job results are not compared. We recommend using this option if the system Always detects differences between backup and previous backup (regardless of the compare configuration). In this case, there is no point running the comparison between backup and previous backup.
- Previous backup <-> backup The program running on the device is compared with the previous backup. It is not compared with the newest version.Detecting a difference here could mean one of the following things:
- A new version of the project has been developed and deployed to the device.
- Actual or forced values were not ignored during the comparison (through which the backup always differs from the previous backup).
- The program on the device was changed. You can find out what was changed by using the compare functionality.
- Server version <-> Backup, Previous backup <-> backup The backup of the (online) version on the device is first compared with the last checked-in version of the project, this backup is then compared to the last backup.This option can give you more information than any other. It is however important to think carefully when interpreting the results.Examples:
- Compare Agent: If you want to use a compare agent for this job, select it under Compare agent. Click on Check connection to ascertain whether it is possible to access the computer on which the agent has been installed. If the connection fails, the job will fail as well.
-
To configure the comparison, check the Enable configuration of job-specific compare checkbox, and then select Comparison configuration.
-

Section: automatically creating versions after job execution
This section is only displayed if in the dialog Upload specific configuration:
- the option Enable automatic creation of a version in the General tab has been activated, and
- if in the tab of the corresponding upload type, the option Enable automatic creation of a version has been checked.
Create version when: In the dropdown list, you can specify when a new version of the component should be created automatically:
- Never: No versions will be automatically created.
- Differences found (Server version <-> Backup): A new version is produced automatically if differences between the server version and backup are detected.
- No base version exists: If no base version exists, a base version will be created independent of the job status.
- Always: If the job has been successfully executed, a new version will be automatically created. If an error occurs during execution, a new version will not be created.
Section: Job information
In this section, you will be find the Job ID and the component ID. These are for example relevant for Scripting.
Section: SIMATIC S7 Settings
Configure the settings for your chosen upload type.
Section: Configure the section Access path details
Select the Access path you want to use for communication with the controller.
Section: Backup
Reduce network load and exclude defined blocks from comparison.
Section: Advanced
Change the TCP/IP port, specify a CPU password, configure retries on failed uploads, and specify waiting times between data packets.

Can I set up versiondog to back up one device after another (never multiple devices at once)?
You can set the backup time so that your devices are backed up with a time delay (go to AdminClient -> Jobs -> Job configuration -> General -> Schedule).
Alternatively, you can set the number of uploads that can be performed simultaneously. Proceed as follows:
- Open AdminClient-> INI files
- Select the AgentStation.inifile (path to the file:
<Drive:>vdServerArchiveVD$AConfigurationUpload). - Look for the section [Common] or add it. Enter the key 4900 with the value 1 (only 1 comparison may be carried out simultaneously).
-
Under [Common], enter the upload class and enter the key 4900 with the value 1.Example:
[Common]4900=1 [FTP] 4900=1
The values in the example mean that never more than one backup is created at a time.
The number of comparisons that may be executed in parallel can be configured as follows:
- Open the AdminClient-> INIÂ files.
- Open the AgentStation.ini file (path to file:
<Drive:>vdServerArchiveVD$AConfigurationCompare). - Search for the section [Common]. If this section is not present, insert it. Write the key 4930 and the value 2.
-
In this section, add the upload class together with the key 4930 with the corresponding value for the parallel comparison, for example:
[Common] 4930=2 [FTP] 4930=2
The values in the example mean that never more than two comparisons are carried out simultaneously.
Note
Please note:
- The [Common] section can be followed by several sections of the type upload class. Possible upload classes are for example UNC, FTP and SimaticS7.
- The value set in the [Common] section is the maximum value. If a higher value for 4900 is assigned in one of the following sections, the maximum value defined in [Common] applies.
- Possible values: Minimum value = 1, maximum value = 1024; default value = 5
Where do I find a 32 character job ID (and how can I copy it into a clipboard)
To find the Job ID, proceed as follows:
- Go to the Jobs section.
- Activate the column Job-ID.
- The job ID will be visible if the job has been run at least once.
Proceed as follows to copy the job ID to the clipboard:
- Click anywhere on the Job ID number and copy with CTRL + C.
- Paste into a text editor such as Notepad. The Job ID will be included among all the other information.
- You need the 32-digit job ID. For all application possibilities of the job ID it is necessary that it is complete and correct.
Why does a job fail to run successfully and end in an error even though an agent is installed and an upload job is properly configured?
Possible cause
This problem could be occurring because the agent do not have the administrative rights required for an application that needs to be opened for the job to run.
Solution
To ensure that the logon account for the agent is correctly set, proceed as follows:
- Open the Windows Services console (Windows -> Start -> services.msc).
- Double-click on the agent service (VDog UploadAgent or VDog CompareAgent).
- Go to the Log On tab.
- The option This account should be selected. If not, select it and enter the username and password of an account which has the appropriate administrative rights.
Related Topics
- Job-Trigger via OPC UA
- System dashboard module
- SIMATIC S7 -> Creating jobs
- SIMATIC S7 -> Configuring the access path
- Advanced job settings